The 6-string bass adds a low B and a high C to the standard four strings — two more strings sitting under your hand and stepping on your tone every time you move. Most "this instrument sounds messy" complaints on a 6-string trace back to right-hand form and thumb-muting habits that haven't caught up with the extra strings. The fix is a relaxed hand shape that keeps the thumb one string behind whatever you're picking, paired with a light left-hand touch so open-string drills actually sound musical.
Left-hand damping comes first
When you run right-hand exercises across open strings, you'll hear the higher strings ringing over the lower ones as you come down — not a pleasant sound. Before you worry about the right hand, lightly lay your left-hand first finger between the nut and the first fret. You're not fretting a note, just touching the strings enough to kill the overring while still letting pitches come through.
Move the finger forward or back until it sounds right. If you press too hard, you'll actually fret a note and the open strings will overring through it. Keep the touch light. This doesn't affect the right-hand form — it just makes the drills nicer to listen to.
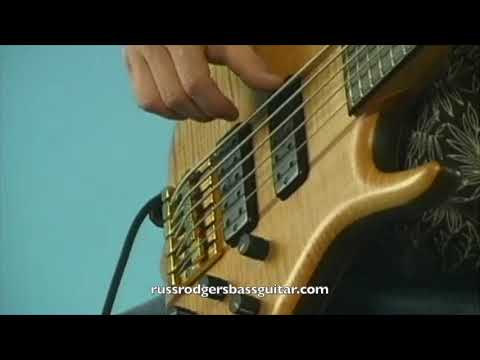
Right-hand position and thumb anchoring
Start by keeping your arm off the bass. Resting it on the instrument interferes with mobility and puts pressure on the veins — enough that your fingers can go numb if you dig in hard. Let the arm float just off the body; a light brush is fine, but don't load real pressure onto it.
Next, place your thumb on top of the pickup. Most players want to sit on what I call the lip of the pickup as an anchor — it feels comfortable, but it gets in the way of the muting we're about to use. Rest the thumb on the body of the pickup instead, and keep your right-hand thumbnail short so the flesh contacts the pickup. If the nail hits, the thumb slides around and you lose your grip. You can shift the hand forward or back along the pickup to shape your tone, but keep it square to the strings.
Finger mechanics
When you pick a note, let the finger glide over the top of the string, grip it, and pull — keeping tension in the two joints of the finger. Don't let those joints buckle in or collapse; if they do, you lose the point of the attack and the tone weakens. Keep the joints stiff and let the string slide out from underneath. Also minimize how far the finger travels: glide across the top, grip, and pull.
Floating-thumb muting across six strings
This is the piece that separates a clean 6-string from a noisy one. As you move from the low B up toward the high C, the thumb follows the hand up the strings, always staying one string behind the one you're picking:
- Picking the B — thumb on the pickup.
- Picking the E — thumb on the B.
- Picking the A — thumb on the B and E.
- Picking the D — thumb on the B, E, and A.
- Picking the G — thumb on the B, E, A, and D.
- Picking the C — thumb on the B, E, A, D, and G.
In the video, I call this "the thumb staying one string behind the string that I'm picking." It keeps the lower strings quiet and keeps the hand relaxed as it moves. The trap on a 6-string is reaching across all six strings with muscle tension in the fingers instead of letting the thumb follow — that burns endurance fast.
Three exercises on open strings
Drill the form across all six open strings with left-hand damping in place. Don't worry about a metronome yet — the goal is muscle memory. Take one string at a time: set the hand, play, reset. Alternate your plucking fingers in both directions so both learn to lead.
- Four notes per string. Play four notes on each open string from B to C and back, alternating one-two-one-two. Then repeat with a two-one-two-one alternation.
- Two notes per string. Same path, two notes each. One-two alternation first, then two-one.
- One note per string. Single notes across all six strings, first with a one-two alternation, then with a two-one.
Take these slow. Once the form feels locked in, a metronome or drum machine is fair game for working on the accuracy of the timing.
Key takeaways
- Left-hand damping with the first finger between the nut and first fret kills overring on open-string drills without affecting the right hand.
- The arm floats — don't rest it on the bass, and keep the thumbnail short so the flesh of the thumb grips the pickup.
- The thumb stays one string behind whatever you're picking; on a 6-string that eventually means resting on five strings at once.
- Keep tension in the finger joints so they don't collapse, and minimize travel — glide, grip, and pull.
Right-hand technique is one of the fundamentals I teach, and the muting habits you build on a 6-string are what let the instrument sound like music instead of mush. The floating-thumb form behind both this post and the 5-string version is laid out in more detail in right-hand form choices for your bass playing. If you play a 5-string, the companion piece — right-hand form for 5-string bass — walks through the same setup with one fewer string to manage. For personalized feedback on your thumb position and finger mechanics, online bass lessons via Zoom are available.
Read the transcript
Hey, and hope you're doing well today. Russ Rodgers back with you with some cool exercises that'll get your right hand working cleanly and efficiently on the 6-string bass. So get your bass out and tuned up, and we'll get started.
Today I'll be showing you some right-hand exercises that will teach your hand to get rid of the string-ringing problems you may have been running into on the 6-string. First, let's look at how to position your left hand while doing these right-hand exercises.
Doing these right-hand exercises, you will run into string overring as you come down from the higher strings to the lower strings, which would sound like this — not a very pleasant sound. So to make this nicer to listen to as you work on these exercises, if you lay your first finger between the nut and the first fret very lightly, it'll mute the strings enough to give you tone, but it'll get rid of the overring so that you can go up and down and it won't sound so jumbled together. Just move the finger a little bit forward or a little bit back to where it sounds good to you. Remember not to press down too hard, because you'll actually fret the note and they'll overring just like open strings will. So just very lightly touch the finger between the nut and first fret.
Now let's take a look at right-hand form, picking, and muting. The first thing about the form of the right hand will be to keep your arm off the bass, because this will interfere with mobility. It'll also put pressure on the veins, taking blood out of the hands — so if you sit there and really dig in like this, you could find your fingers going numb while you play. Just let the arm float a little bit off the bass like this. It's okay if it touches just a little bit, but don't put any kind of significant pressure there.
Next thing we want to do is place the thumb on top of the pickup here. Most people like to sit on what I call the lip of the pickup as an anchor, and it does feel comfortable, but it also interferes with the muting technique that I'm going to show you. So it doesn't work very well to have the thumb here. We rest the thumb on top of the pickup — also keeping your thumbnail short so that the flesh part of the thumb will contact the pickup, because if the thumbnail hits it, it'll slide around and won't be very comfortable to do.
Now, as you get this form down, you will be able to move the hand this way and this way depending on what kind of sounds you want to get. Always make sure you go straight up and down along with the pickups in this type of angle. You don't want to start here and end up here.
Picking the strings, we just let our finger glide over the top of the string and grip it, and keep tension in these two joints. Don't let these two joints buckle in or collapse as you pick the string. In other words, you wouldn't want it to go like that — you'd want to keep the joint stiff and let the string slide out from underneath the finger. Because if I let those joints collapse, listen to the sound — not as much point to the attack, and the tone's not as good. But if I tighten up those joints, you hear how the sound of the bass gets better. Also reduce the amount of height that the finger goes over the string to pick. You don't want it to go out and over. Basically just glide over the top, grip it, and pull it, minimizing all the excess motion as you do it.
When I go to the E string from the B, my thumb just sits on top of the B like this, and then I pull the E string with the fingers falling firmly against the B string as I pull them over the E. When I go to the A, my thumb slides onto the E — it's now touching the B and the E. When I go to the D string, my thumb now touches the B, E, and A. When I go to the G, I'm now touching the B, E, A, and D. So you see the thumb staying one string behind the string that I'm picking. And when I go to the C, I'm now touching the B, E, A, D, and G with the thumb and picking the C. This keeps all the lower strings quiet while I'm playing on the higher strings, plus keeps the hand very relaxed as I move up and down the strings. A lot of the problem with this 6-string bass is people will reach and use all this muscle energy just to do that, and that'll take a lot away from your endurance while you play.
Now for exercise one. In exercise number one we're going to have four notes per string. We want to alternate one-two, one-two up and down several times, and then go back and do a two-one, two-one alternation. I suggest counting one-two-one-two and two-one-two-one as you go up and down the strings. Also, don't worry about doing these in time or with a metronome at first, because it's really about getting the muscle-memory programming of the right hand going. Later on, when you get this down, you can go ahead and do it in time with a metronome or drum machine to work on the accuracy of the timing of it. But for right now, I recommend just doing one string at a time — set the hand, do the next string, set the hand, do the next.
Here we go — exercise number one: one-two, one-two, one-two, one-two, one-two, one-two, one-two, one-two, one-two, one-two, one-two, one-two, one-two, one-two. Now two-one alternation: two-one, two-one, two-one, two-one, two-one, two-one, two-one, two-one, two-one.
Let's look at exercise two. In this one we're going to be doing two notes per string, again alternating one-two, one-two, and then going back and doing a two-one. One-two, one-two, one-two, one-two, one-two, one-two, one-two, one-two, one-two, one-two, one-two, one-two, one-two, one-two. Now two-one alternation: two-one, two-one, two-one, two-one, two-one, two-one, two-one, two-one, two-one.
Now let's check out exercise three. Exercise number three is going to be one note per string. Remember to take these real slow and focus on the right-hand form. It's not about fast — this is about really accuracy and reducing all the excess motion of the right hand. Here we go: one-two, one-two, one-two, one-two, one-two, one-two. A two-one alternation: two-one, two-one, two-one, two-one, two-one, two-one.
Thanks for joining me today, and I hope these exercises will help you in working up your right-hand technique.