
Zoom Setup for Online Bass Lessons
404-386-0983russrodgers@gmail.comTestimonials See Example Lessons On My YouTube channel
This guide walks you through setting up audio equipment and Zoom for live online bass lessons . Follow the steps below to get ready for your first lesson.
for offline reference.
Shopping List
Choose one of the two setups below. The standard setup uses a separate microphone and headphones (over-ear speakers with no microphone). The budget setup uses a headset (headphones with a built-in microphone) instead, which costs less and requires fewer cables.
Standard Setup (~$239)
Separate microphone and headphones for the best audio quality.
| Item | Price | Notes |
|---|---|---|
| Rockville RockMix 4 mixer | ~$60 | Connects everything together. Comes with USB cable and power adapter. |
| Shure SM58 microphone | ~$99 | For your voice during lessons. |
| Microphone stand | ~$15 | Holds your microphone on your desk. |
| XLR cable | ~$10 | Connects microphone to mixer (the round connector). |
| 1/4-inch instrument cable | ~$15 | Connects your bass to mixer (the larger plug). |
| 3.5mm to dual 1/4-inch cable | ~$10 | Connects phone/tablet to mixer for playback audio (backing tracks, metronome). |
| OneOdio Pro-10 headphones | ~$30 | Includes 1/4-inch cable — plugs directly into mixer headphone jack. |
Budget Setup (~$125)
Uses a headset (headphones with a built-in microphone) instead of a separate microphone and headphones.
| Item | Price | Notes |
|---|---|---|
| Rockville RockMix 4 mixer | ~$60 | Same mixer as the standard setup. Comes with USB cable and power adapter. |
| HyperX Cloud Stinger Core headset | ~$40 | Headset with built-in mic. Includes Y-splitter cable (separates mic and headphone plugs). |
| 1/4-inch instrument cable | ~$15 | Connects your bass to mixer (the larger plug). |
| 3.5mm to dual 1/4-inch cable | ~$10 | Connects phone/tablet to mixer for playback audio (backing tracks, metronome). |
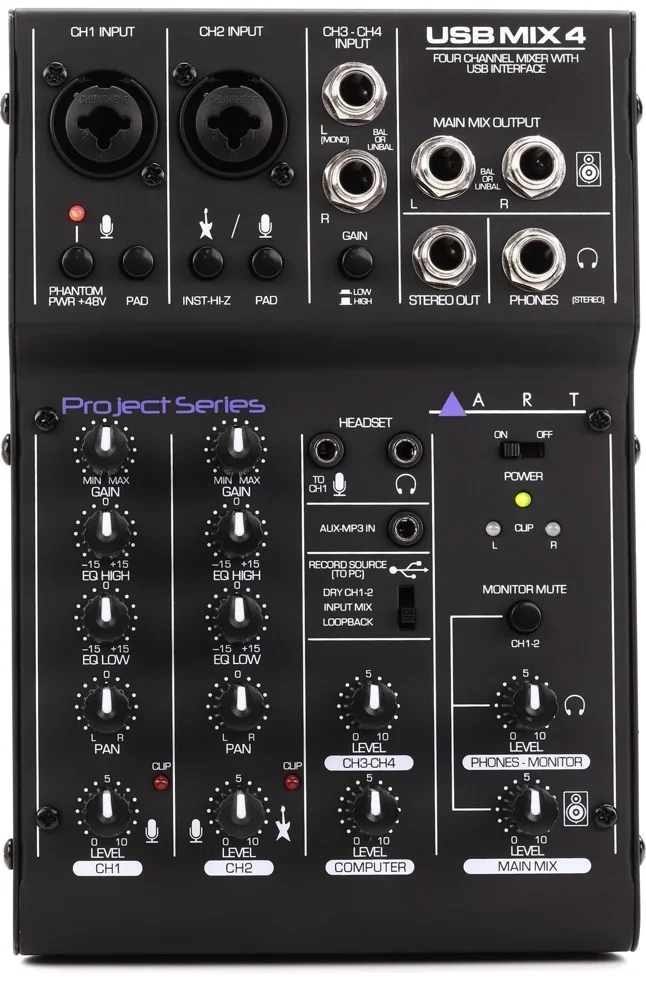
Why this mixer? The RockMix 4 has a Record Source switch that prevents audio echo in Zoom — most cheaper mixers don't have this. The ART USB Mix 4 (~$140) is an equivalent alternative that has been personally tested and used in lessons.
You May Also Need
- USB-C to 3.5mm adapter (~$8) — if your phone doesn't have a headphone jack.
- 1/4-inch to 3.5mm adapter (~$8) — only if your headphones have a 3.5mm plug (the small plug) instead of 1/4-inch (the large plug).
What Your Cables and Gear Look Like
Not sure what these cables are? Here's a visual reference so you know exactly what to buy.
Setup Steps
Follow these steps to connect all your gear. Use the diagrams below to find each connection on the mixer.
Mixer — Top View
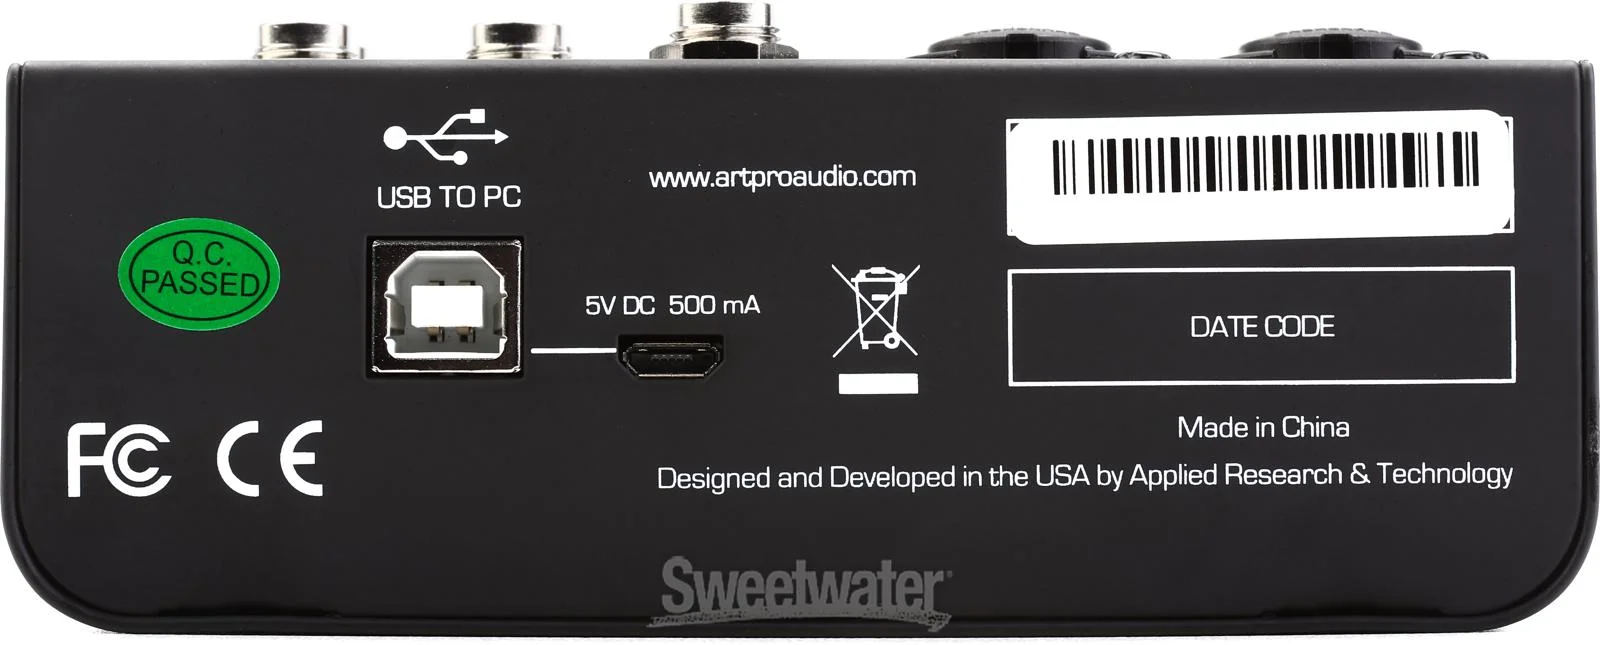
Mixer — Back Panel
Connect your microphone (standard setup only)
Place your microphone in a desk stand and position it near your mouth. Plug one end of the XLR cable into your microphone and the other end into the CH1 input on the mixer.
XLR cable — male end (pins) to mixer, female end (holes) to microphone About phantom power: The Shure SM58 does not need phantom power. If you use a condenser microphone that requires it, turn on the +48V switch on the mixer. Otherwise, leave it off.
Connect your bass
Plug your 1/4-inch instrument cable (the larger plug) from your bass into the CH2 input on the mixer.
About Hi-Z: If your bass is passive (no battery compartment), press the INST/Hi-Z button on the back of the mixer. If your bass has an active preamp (battery compartment), leave this button off.
1/4-inch instrument cable — plug one end into your bass, the other into CH2 Connect your playback device
Your playback device can be a phone, tablet, or computer — anything that plays backing tracks, metronome apps, or lesson materials. See apps for lessons for the specific tools I recommend students use.
Plug the 3.5mm end (the small plug) of the cable into your device's headphone jack.
Plug the two 1/4-inch ends (the larger plugs) into the CH3 (L/left) and CH4 (R/right) inputs on the mixer.
No headphone jack? Use a USB-C to 3.5mm adapter (or Lightning to 3.5mm for older iPhones).
Tip: You can also use the AUX/MP3 IN jack (3.5mm on the top of the mixer) with a simple 3.5mm-to-3.5mm cable. This is easier to connect, but you won't have a volume knob on the mixer for playback audio.
Set your playback device's volume to maximum. Use the CH3/4 knob on the mixer to control the playback volume.
3.5mm to dual 1/4-inch cable — small plug to your device, two large plugs to CH3/CH4 Connect your headphones
Plug your headphones into the PHONES output (1/4-inch jack on the front of the mixer).
If your headphones have a 3.5mm plug (the small plug), use a 1/4-inch to 3.5mm adapter.
Warning: Do not use the HEADSET jack on the mixer if you are using a separate microphone in CH1. Plugging into the HEADSET jack disables the CH1 input.
OneOdio Pro-10 headphones — includes both 1/4-inch and 3.5mm cables Set the Record Source switch
Find the RECORD SOURCE (TO PC) switch on the top of the mixer. Set it to INPUT MIX .
This is the most important setting on the mixer. INPUT MIX sends your voice, bass, and backing tracks to Zoom — but does not send Zoom's audio back. This prevents echo and feedback.
Warning: Do not use the LOOPBACK setting. It will send Zoom's audio back to Zoom, creating an unusable echo for your teacher.
See the top view diagram above to find the Record Source switch.
Connect the mixer to your computer
Plug the included USB cable from the back of the mixer into your computer. This is how the mixer sends and receives audio with Zoom.
Connect the included power cable (micro USB) to power the mixer. Plug the other end into a wall outlet or power strip.
Your computer recognizes the mixer automatically — no software or drivers to install. See the back panel diagram above.
Computer Audio Settings
Tell your computer to send audio through the USB mixer so you hear everything in your headphones.
Mac
Open System Settings > Sound > Output. Select the USB mixer (it appears as "USB Audio CODEC" or something similar).
Windows
Open Settings > System > Sound > Output device. Select the USB mixer.
Windows 10 has a similar path — look for Settings > System > Sound.
Important: If you are using your computer as the playback device (instead of a phone or tablet), do not set your system audio output to the USB mixer. Set it to your computer's built-in speakers or headphone jack instead. Only Zoom should send audio to the mixer. If both Zoom and your system audio go through the mixer, Zoom's audio will loop back and create echo.
Zoom Audio Settings
In Zoom , go to Settings > Audio.
- Microphone: select the USB mixer.
- Speaker: select the USB mixer.
- Enable Original Sound for Musicians — this preserves your bass tone. Zoom's default audio processing filters out low frequencies, which makes your bass sound thin and distant.
If your computer is the playback device: In Zoom, set Speaker to the USB mixer. But your system audio output (outside Zoom) should go to your computer's built-in speakers or headphone jack — not the mixer.
Mixer Settings & Levels
These are good starting points. You can fine-tune during your first lesson.
- Record Source
- INPUT MIX (see Step 5 above).
- CH1 (voice)
- Start at 5. Adjust so the green LED lights on peaks — if the red LED stays on, turn it down.
- CH2 (bass)
- Start at 5. Same as above — green LED on peaks, no steady red.
- Gain (CH1 and CH2)
- Start at the midpoint (12 o'clock). Turn down if the red clip LED stays lit.
- CH3/4 (playback)
- Start at 5. Adjust for comfortable backing track volume in your headphones.
- COMPUTER (teacher's audio from Zoom)
- Start at 5. Adjust so your teacher's voice is comfortable in your headphones.
- PHONES/MONITOR
- Adjust for comfortable headphone volume.
- MAIN MIX
- Start at 5. Controls the overall level sent to Zoom.
- EQ (HIGH and LOW)
- Leave at center (12 o'clock) — flat, no boost or cut. Adjust later if needed.
- PAN (CH1 and CH2)
- Leave at center.
- Phantom power (+48V)
- Leave OFF unless your microphone requires it. The Shure SM58 does not need phantom power.
How the Audio Works
Understanding what goes where helps you troubleshoot if something sounds wrong.
What your teacher hears
Your voice (CH1) + your bass (CH2) + your backing tracks (CH3/4) are mixed together and sent to Zoom through USB.
Your teacher hears everything you're playing and saying, plus any backing tracks.
What you hear in your headphones
Your voice (CH1) + your bass (CH2) + your backing tracks (CH3/4) + your teacher's audio from Zoom (Computer channel) — all mixed together in your headphones.
You hear everything: your own audio plus your teacher.
Why there's no echo
The Record Source switch set to INPUT MIX is the key. It sends your input channels to Zoom, but does not send Zoom's audio (your teacher's voice) back to Zoom. Without this, your teacher would hear their own voice echoed back with a delay.
This is why we recommend the Rockville RockMix 4 or ART USB Mix 4 — they have this Record Source switch. Most USB mixers don't, and will always send everything back to Zoom (full loopback), causing echo. If you own a mixer without this switch, see the alternative setups below.
Alternative Setups
The standard setup works for most students. These alternatives cover special situations.
Budget Option: Using a Headset Instead of a Separate Microphone
If you bought a headset with a Y-splitter (a cable that separates the mic and headphone plugs) instead of a separate microphone and headphones:
- Plug the mic cable from the Y-splitter into the HEADSET mic jack (3.5mm) on the mixer.
- Plug the headphone cable from the Y-splitter into the HEADSET headphone jack (3.5mm) on the mixer.
Note: This routes the headset mic to CH1 and disables the CH1 XLR input and the 1/4-inch PHONES output.
All other setup steps remain the same — bass in CH2, playback in CH3/4, Record Source on INPUT MIX.
Alternative: Using a DI Box or Preamp Pedal
If you own a DI box (direct injection box) or a bass preamp pedal with a DI output (XLR out), you can use it for better tone shaping before the signal reaches the mixer.
- Connect: Bass → DI box or preamp → XLR cable → CH1 or CH2 XLR input on the mixer.
- You'll need an additional XLR cable.
This gives you more control over your bass tone. The DI box converts your bass signal to a balanced signal, which can reduce noise.
Alternative: Using an Audio Interface Instead of a Mixer
If you already own a USB audio interface with at least 4 channels, you can use it instead of a mixer.
The concept is the same: bass + mic into the interface inputs, interface connected to your computer via USB.
Key difference: Most audio interfaces don't have a Record Source switch, so you'll need software to control what Zoom hears. See the advanced sections below for Loopback (Mac) or VoiceMeeter (Windows).
Alternative: Using an Existing Mixer Without a Record Source Switch
If you already own a USB mixer that doesn't have a Record Source / TO PC switch, you can still try it.
Your teacher may hear their own voice echoed back because the mixer sends everything (including Zoom's audio) back over USB.
Workaround: Mute yourself in Zoom when you're not playing or speaking to reduce the echo. This works but isn't ideal — your teacher loses the ability to hear you continuously.
For the best experience, consider upgrading to a mixer with a Record Source switch, or use the advanced software routing setup below.
Advanced: Software Audio Routing with Loopback (Mac)
For tech-comfortable students who want fine-grained control over every audio source.
Requires a USB audio interface (not a mixer) + Rogue Amoeba Loopback software ($99).
Loopback lets you create a virtual audio device that combines your interface inputs, system audio, and individual apps into custom mixes. You can control per-application volume and routing — for example, different audio mixes for yourself vs. what Zoom sends to your teacher.
This is the setup used by advanced students for maximum audio quality and flexibility.
Detailed walkthrough coming soon.
Advanced: Software Audio Routing with VoiceMeeter (Windows)
The Windows equivalent of Loopback — free software by VB-Audio VoiceMeeter .
VoiceMeeter creates virtual audio devices for routing and mixing. More complex to set up than Loopback, but very powerful once configured.
Detailed walkthrough coming soon — pending testing.
Tips for a Better Lesson Experience
- Camera positioning: Mount an external webcam on a stand, angled down to show your fretboard and hands. This helps your teacher see your technique clearly.
- External monitor: Use a second screen for lesson materials, PDFs, or sheet music while keeping Zoom on your main screen.
- Wired internet: Connect to your modem with an ethernet cable instead of WiFi when possible. This reduces latency and improves connection stability.
for offline reference.
404-386-0983russrodgers@gmail.comTestimonials See Example Lessons On My YouTube channel